An ElevenLabs Alternative for Local Voiceovers
Clone your voice and turn scripts into speech on your own computer. VoiceStudio offers a local alternative to ElevenLabs, with saved voices, short previews and long-form audio production in one desktop app.
Overview
What you get
- Reusable voice profiles created from short recordings.
- Local text-to-speech, playback and audio export.
- Stories and Audiobook workspaces for longer scripts, plus transcription and dubbing tools.
Good fit
- Making course narration, video voiceovers or audiobook drafts with a consistent voice.
- Generating speech locally after downloading the runtime and selected models.
Tutorial
Understand the voiceover workflow
If you want ElevenLabs-style text-to-speech and voice cloning on your own computer, start with VoiceStudio. The first setup downloads the runtime and models. This tutorial uses a local speech engine to make a short course introduction.
There are two separate inputs:
- Reference recording: teaches the model the voice. Its transcript should match what the recording says.
- Script: the new words you want the voice to say. They can differ from the recording.
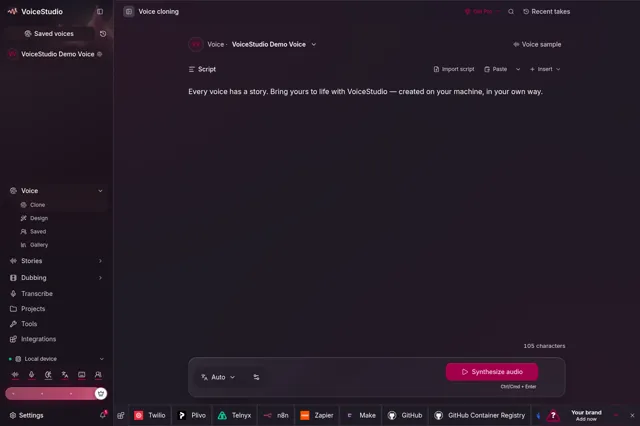
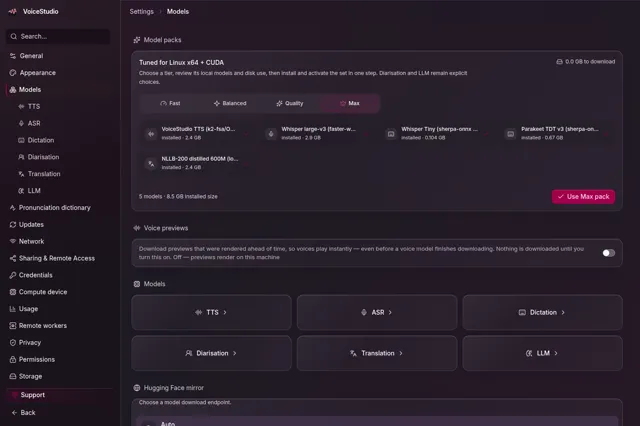
You will finish with a saved voice and an audio file you can export. The images above are the author’s voice-cloning and model-management screens. Follow the path from recording to saved voice, then from script to generated audio.
Leave the other workspaces for later: Transcribe turns audio into text, Dubbing handles video dubbing, and Stories / Audiobook organize longer scripts.
Install the desktop app and prepare a model
Download the package for your computer from the v0.5.6 release. For this local exercise, use Windows x64, Linux x64 or an Apple Silicon Mac. Intel Macs need a backend running on another device.
| Computer | Download |
|---|---|
| Windows x64 | VoiceStudio-Electron-0.5.6-win-x64.exe |
| Apple Silicon Mac | VoiceStudio-Electron-0.5.6-mac-arm64.dmg |
| Linux x64 | VoiceStudio-Electron-0.5.6-linux-x64.AppImage or .deb |
The default engine, OmniVoice, appears as VoiceStudio in the interface. Its documentation recommends about 6 GB or more of dedicated GPU memory. Apple Silicon uses unified memory. CPU generation is also supported but is slower, so begin with a short sentence.
The default OmniVoice pretrained weights have a non-commercial restriction. For commercial work, choose a model with suitable terms before downloading it. See the repository’s license notice.
- Install and open the app. On macOS, drag it into Applications. On Windows, run the installer. On Linux, install or launch the package you chose.
- Follow the first-run guide to install the local runtime and speech model. If you see Install local runtime, start there.
- In Settings → Models → TTS, check that the default speech engine is installed and ready, then open Voice cloning.
You should be able to enter the voiceover workspace and select a local voice. Generation time depends on your hardware and script length. Loading the model for the first time also takes time.
Save your own voice
Prepare a clear recording of yourself speaking normally. Start with about 3–10 seconds, without background music or overlapping speakers. For example, record: “Welcome to today’s course. We will start with a simple example.”
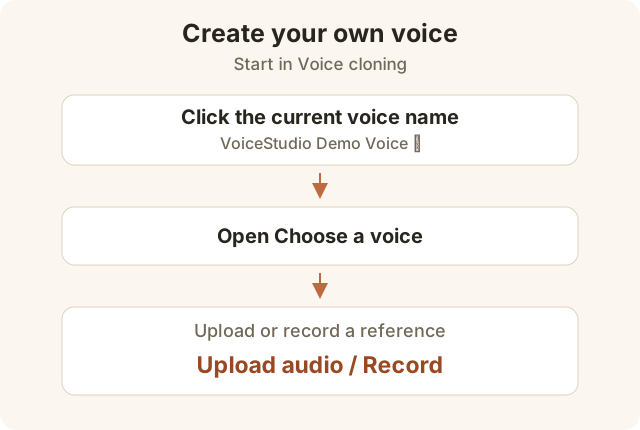
- Open Voice cloning. If a voice is selected, click its name at the top to open Choose a voice. If no voice is selected, this screen opens directly.
- Choose Upload audio to select the recording, or Record to record it directly.
- After uploading or recording, expand Optional details. In Transcript, check or enter the words spoken in the recording. Correct any automatic transcription errors here.
- In Save as voice profile, enter a Profile name such as “My course voice,” then select Save.
The voice should appear in Saved voices. Next time, select it and supply a new script.
The transcript should match the reference recording. The script in the next section supplies the new speech. They do not need to contain the same words.
Preview a short passage and export it
Use a short passage to check the voice and pauses first. Enter this practice script, written for this tutorial, into Script:
Welcome to today's course. We will complete a small exercise, then use it in your own project.- Select your saved voice and enter the practice text into Script.
- Set the output language to English, or use Auto. This selects the script’s language. For speech in another language, supply a script in that language too.
- Select Synthesize audio, wait for the result, and play it.
- Listen to the pause after “course,” check that the sentence ends cleanly, and compare the voice with your recording. When satisfied, select Save as… and choose a file location.
You should be able to play the result in the workspace and find the exported audio at the location you chose. Once the short passage sounds right, add the finished script in sections to reduce rework.
Change one thing and compare the result
Keep the current audio as version A. Leave the voice, language and generation settings unchanged. Change only the sentence breaks:
Welcome to today's course. We will complete a small exercise. Then, we will use it in your own project.- Replace Script with the revised text, generate it again, and save it as version B.
- Compare the rhythm after “a small exercise.” Choose the version that better fits your explanation.
- If a name is pronounced incorrectly, change only its spelling or phonetic wording in the next attempt. Preview the same sentence again.
Punctuation and sentence length influence the rhythm. Changing one type of problem at a time makes useful adjustments easier to identify.
Adapt it to course narration or an audiobook
Divide your own script into sections and reuse the saved voice. First, fill in this production brief:
Purpose: [course narration / video voiceover / audiobook]
Voice: [saved voice name]
Script language: [language]
First section to preview: [paste a short passage]
Pronunciations to check: [names, brands, abbreviations]
Chapter order: [chapter titles]
Deliverable: [one clip / chapter files / complete book]- Check pronunciation and pacing with one short section in Voice cloning.
- For a longer sequence of passages, open Stories and choose a default voice. For a manuscript with chapters, open Audiobook and enter or import the text.
- In Audiobook, use Preview plan to check the chapters, then audition chapter excerpts. Revise individual chapters as needed before generating and exporting the full manuscript.
The application code uses AGPL-3.0-only. Models and recordings have separate terms; see the license notice.
For batch work, see the bundled API and MCP workflow. It connects to a running VoiceStudio service. Add automation after you have completed the desktop workflow.